Showing posts with label My Favorite Things. Show all posts

Thursday, November 23, 2017

Foiled Christmas cards

My mom was kind enough to give me a bunch of her craft supplies that she never planned to use.  So I've been busy over the last week making a boat load of Christmas cards!
Thank you MOM!!


These are kits from Hot off the Press.  They are die cut, so all I had to do was layer the pieces using foam tape.
Pretty quick and so gorgeous! The kit even comes with suggestions for the cards assembly.

This one though is my own idea, I thought this really needed a gate fold card.
The stamp inside is from My Favorite Things.


Wednesday, October 12, 2016

Christmas gift card


DTC Designer


Sponsor

Hello, it's time for a new challenge at Decorate to Celebrate, Stamp Prints is our sponsor and I chose the Poinsettias for my card.  I cut the piece into 3 equal pieces after I colored it and spritzed with with gold shimmer spray for a tile look.
I then created my card to resemble a Christmas gift using my bow die cut from My Favorite things.


Friday, August 19, 2016

QKR Shaped card challenge


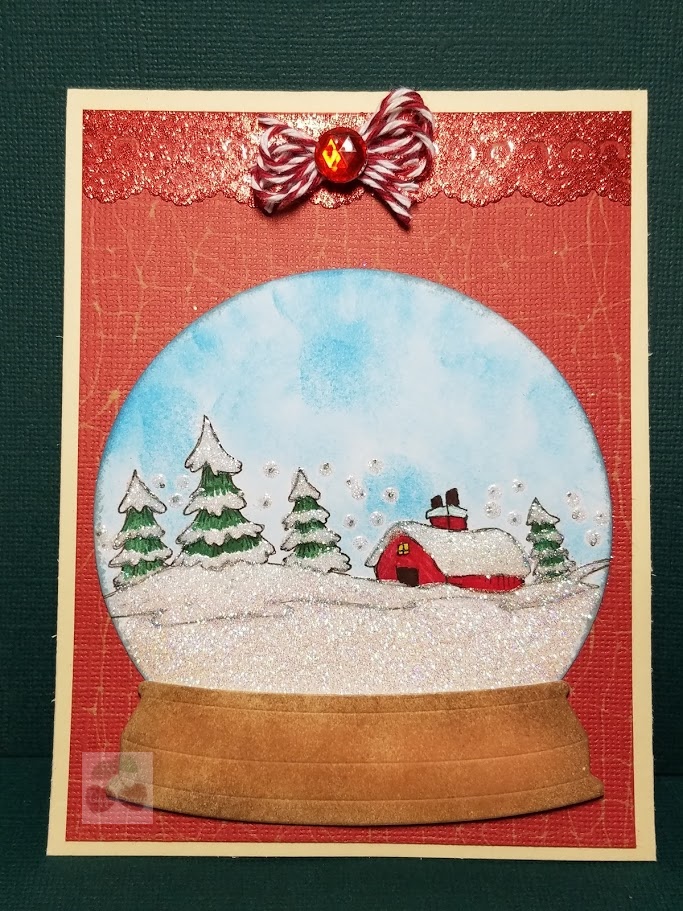
For today's challenge I am using a great snow globe type image, I thought,
So I actually made 2 cards.  I used a mason jar cutting file from the SIL store to create my shaped, shaker card.  I used my fuse tool to make the pocket for the little snowflakes.


For my second card, I used my cutting dies from My Favorite Things to create a pretty snow globe card.


Saturday, May 16, 2015

My Favorite Things cards

I finally made it to a class at My Favorite Things last weekend. 
It's been ages since I've been able to go.
Jody didn't disappoint! I love her attention to detail, her cards are wonderful!

We used wooden coffee stirrers for the puppets' sticks, instead of just stamping the wood grain on the rectangle frame we cut strips from a piece of card stock so the grain would be going in different directions like an actual frame that was built by hand.  That was the detail that blew me away, I would have never thought about that.

When I saw the new barn die, I knew I had to have it.  Being from Kentucky, I saw a lot of them growing up.  There is this one HUGE black barn in my home town that's kind of a big land mark.  I can't wait to make a card recreating it.
For my card in class though, I used pink and yellow for a girly barn and to make it look like layers of paint are peeling.  I even lightly painted the interior of the doors and stamped the woodgrain on top of the paint.

The story behind this card is, Jody looked up flamingo sunsets on google and found one she felt she could recreate. We used 4 different ink pads in yellows and oranges and sponged the color onto the paper.  The images were die cut from black card stock and put in front of the sponging.  The sun is cut from yellow card stock.


After getting home I wanted to play with the barn a bit so I got out my coredinations sand-able card stock, and the crackled card stock I have in my stash.  The center barn I used some Tim Holtz crackle and painted it unevenly.  These look pretty cool too. 

Want to shop for yourself?  Here's the link to their site.
And if you want to check out Jody's blog, here is her link


Sunday, January 26, 2014

Valentine treat bag

3 Girl JAM

Hey there! I am sharing a project today using some fabulous 3 Girl Jam products, AND something I rarely do, it's not a card or a lay out or a little favor box, are you ready for it?
 How beautiful is this lace?  A fellow DT member shared this fabulous tutorial on how to make these lace flowers, check it out, you will be surprised how easy it is to get a gorgeous embellishment.
Here's what I ended up with.  I started with a plain muslin bag.

I used 3 different colors of alcohol ink bottles and just dropped them randomly over the dry bag.  I then soaked the bag with alcohol and rolled it up, squeezing it all over to help distribute the color a bit.  After about an hour I rinsed it out then laid it out to dry over night.
 The next day I got out one of my My Favorite Things stamp sets and some regular dye based ink pads and stamped away.
 I used hot glue to adhere the lace flowers to the bag as well as add the pearl centers.

Are you curious what I will do with it?  It contains Emily's Valentines day treats.  It holds a lot, she will be thrilled! 
 Isn't it pretty?  I SO love how it turned out, I'm proud of myself, I have been really intimidated by these bags and have gotten rid of quite a few over the years because I never knew what to do.
 I'm happy Julie sent me several in my dt package, these are fun!
Keep checking back for the lace, it will be in the store soon.

Sunday, April 15, 2012

My Favorite Things class and Emily

Spring is here and I wanted to share my daughter's Easter pictures.  She is so photogenic and had so much fun with the baby chick. I just love her to pieces. 


And here is the true Emily! She picked out her outfit and managed to get most of it on with minimal help.  My Mom and I had plans to attend a stamp class so Pappa was going to baby sit.  The afternoon plan was to swing, play in the sand box and draw with chalk on the car port.
 I keep saying we need to get her an agent because she is a true entertainer and is always making us laugh.
Here are the gorgeous cards my mom and I made
My Favorite Things has opened a store very close to my parent's house.
This was a new release class, all the stamps we used are brand new.
 My copic skills are lacking, hoping the next class I take at the store will be a class on how to blend better with them.
 I really like this card the best.  The paper is "This N That" by Lori Whitlock, I'm heartbroken they didn't have it for me to buy but I'm on the hunt.
And finally this really fun card, it says "The best things in life can't be bottled" then inside it says "or can they?"
I love that part of the images are colored and part are paper pieced.  Such a nice effect. 
Here's a link to the website if you want to pick up a few of the new products.